Showing posts with label art and craft. Show all posts

Tuesday, July 12, 2016

How to Make a Journal Slip Cover


Fabric journal slip cover tutorial.
Hi folks. Back again and this time with a new tutorial!

I love collecting interesting fabrics, buttons, silks and ribbons. With opportunity shops sometimes being the best source of textile goodies! 

Shabby journal slip covers are a fantastic idea for using up your stash, having fun and great gift ideas for yourself or someone special.

Upholstery fabrics are great for fabric book covers.

A little bit of machine embroidery, hand dyed silk ribbons and left over felt pieces make great additions.
This Book Cover PDF tutorial is easy to follow with lots of pictures! Only $5.99 Aus
11 pages.
Easy to follow instructions. 
Download and print out or read straight off the screen.

Ideas for embellishments.


Fabric Journal Slip Cover PDF Tutorial

Buy now - only $5.99 Aus
Check out hand dyed silk papers, silk ribbons, wool locks and other wonderful textile craft supplies here.

Friday, May 20, 2016

Decorated Pegs

Decorated Pegs

I was having a peruse in a little book from the library the other day on decorating your home in a shabby chic style. 
Now I have to admit , my decorating skills are more shabby than chic! But still, I do love the romantic style and I do love pastels!

One of the little ideas in the book was a pin up board with decorated pegs. I had the pin up board.
It was an old cork board which I had covered with fabric first then wound ribbon around it and stapled it into the frame at the back.
I was tucking pictures into the ribbon before, but they would tend to fall out. So these little pegs do the trick really well.

Easy peasy to do.

1. Grab some wooden pegs, (Ive used normal household laundry pegs)

2. Assorted acrylic paints. (I used matt acrylic Semco range from Spotlight )

3. Decorative buttons (I had some wood decoupaged with flower buttons lying around).

4. Strong adhesive glue. ( I used Craft Smart mosaic adhesive)

Once you have your supplies together.

1. Paint your pegs - couple of coats should do it. Wait to dry. After the paint dried, I gave the pegs a little sand to 'scrappy' up the edges a little.

2. Glue buttons to pegs - let them dry overnight.

Use them to peg up pretty banners, kids art, recipes. To do lists - no, not them. There's enough to do without having a 'to do' list as well!


Now that was easy!

Friday, May 6, 2016

Friday Tulips

How's it going folks? Ive been a little 'ho hum' with a nasty cold. Hmmm, it must be nearly Winter!

Actually, I love Winter. I'm a 'green' girl. The pastures fill with grass again with feed for the horses, my garden gets watered more regularly (more weeds to deal with as well of course). But I also have a great excuse to play more in my studio! Plus we have a tin roof and there is nothing better in this world than listening to rain on a tin roof at night time. :-)
Which is your favourite season. Why?

But I digress. Even though I have been feeling pretty yuk, I have managed play with some paint on a little canvas for Paint Party Friday. I am working on a series of flowers at the moment, and had thought that after applying some varnish to make the colours pop it would be finished. But looking at it now, there's a little more work to be done yet. Maybe? Any ideas? (other than sorting out the horizon line)

Pink poppies acrylic painting

Addit - Mothers Day! Happy Mothers Day to you all!

Well, I had another look at my Tulips and decided that after a little advice from the clever Linda, I would add a little birdy and a few golden stenciled blossoms. I am now happy!


And I had some lovely lush yarn that I thought I would crochet up into a nice scarf. 


 And just to finish off for the day, I found this rather showy hibiscus that was almost bigger than the plant itself! Perfect for Floral Friday.


Well, that is definitely my lot for today. Time to go in a say hello to hubby as it must be cup of tea time. 
Tarrah all. :-)

Thursday, November 19, 2015

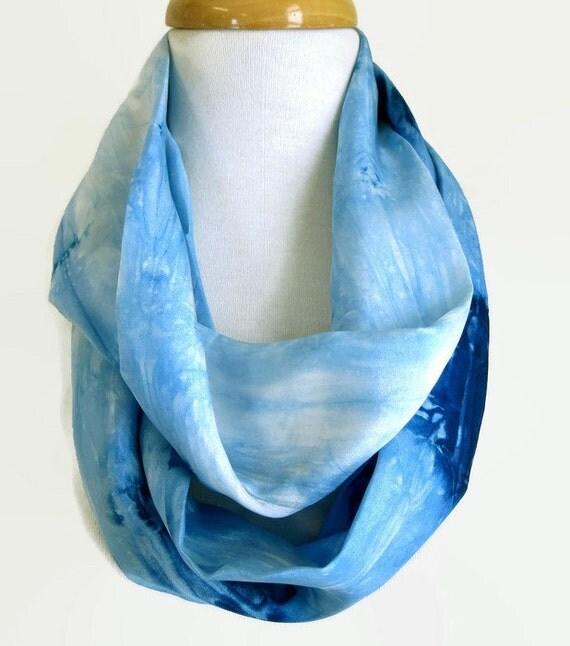
Resist Dyed Silk Scarf for Summer

Blue and White Silk Scarf

I love resists when painting up silk and cotton scarves! And today I thought I would play with some pieces of ply that I had lying around.

Resist for dyeing silk
 After wetting down my scarf, I folded it in a rather messy fashion first then wrapped it tightly around this little piece of ply.

I didn't take anymore pics of the process but using some Jacquard and Landscape acid dyes I flooded the wrapped silk, then steamed it in the usual fashion.

I love it when the silk is unwrapped! Its a surprise every time!

I was after a more crisp blue and white design, but this one came out more subdued. Still pretty I think? The images reminded me of one of those ink blot tests! I see anchors, what do you see? ;-)


Resist dyed Silk Scarf by Sesenarts

I ended up sewing it into an infinity style. Much more practical for silk scarves!

Sunday, November 15, 2015

Latest and greatest nuno felt wrap!

Well I'm not sure if its the greatest? But its definitely the latest!

I actually gave you a hint of my latest nuno felt wrap in my first post on attempting to tidy my studio.


Nuno felt scarf in process
There she is. This is one of my stained glass scarves in process. I combine my own hand painted or dyed silks, along with commercial silks and laces and hand dyed wool/silk roving to create these OOAK wearables
They generally start with one piece of fabric that catches my eye which just carries on from there! I rarely have a finished piece in mind. They seem to grow just by themselves!

Silk and Wool Nuno Felt Wrap
Red and Black Special Occasion Stole
I am very happy with how this girl turned out. (they are all girls to me!) 

I love this form of felting. You never quite know how they are going to turn out, and each one always has a bit of a learning curve attached to it! Never easy!

Sunday, November 8, 2015

An Inspired Life

Earlier this year I decided it was time to put brush to canvas again. I had been too long away and had been focusing on the textile arts and crafts and was missing the lusciousness of working with liquid mediums.
Christine Skeggs from SkeggsArts in Bunbury was holding mixed media workshops in Busselton, so I had no excuse!

Christine (on the left) with a few of her art students.
It was time to play again! Yay! Christine has the same affinity with mixed media on canvas as I, so was the perfect teacher to get me going again.
Unfortunately, with this last term getting busy for me with my online stores I was only able to attend one term. But I will be back next year Christine! It was so much fun!

She holds an end of year exhibition for all her students work and luckily I was able to complete one painting. ( I do have another part completed sitting in the wings) This was great for me as I was able to see the amazing creations of other artists in the area.

A beautiful honey eater on display.
My piece (below) was inspired by both imagery from the book Wabi Sabi Workshop by Serena Barton and the words of Lao Tzu from one the books of the late and great inspirational author, Dr Wayne Dyer.

“This is called the Hua Hu Ching, written by Lao Tzu. It’s the unknown teachings of Lao Tzu. Number 51 says, ‘Those who want to know the truth of the universe should practice the four cardinal virtues. The first is reverence for all of life. This manifests as unconditional love and respect for oneself and all other beings. The second is natural sincerity. This manifests as honesty, simplicity and faithfulness. The third is gentleness, which manifests as kindness, consideration for others and sensitivity to spiritual truth. The fourth is supportiveness. This manifests as service to others without expectation of reward.”

This verse above plus another was used as part of the design.
My canvas was created using tissue, wisps of wool fleece and a fine fabric mesh donated by another member in the class. Then washes of colour painted on then wiped off to leave just a tint. I'd wait for one layer to dry before applying the next. 
An Inspired Life
Wayne Dyer had only just passed away a few days before working on this piece and I was feeling quite sad at the loss of this great mentor in life and felt I needed to somehow convey something in this canvas to show my respect for this great man.
He was inspirational in so many ways and in turn was inspired by the Tao Te Ching, so it seemed right to include this verse that was so important to him into the image.
Me
So thank you to both Christine and Dr Wayne Dyer for your inspiration!

Note - This painting is for sale. If interested please inquire.

Friday, November 6, 2015

Studio Makeover

OMG! Looks like a bomb has hit my studio!

This is what I want.
This is what Ive got!


Let me start at the beginning. ( a very good place to start... sorry, couldn't help myself there)

I am a textile and mixed media artist with a general A.D.D slant. That being the case, I tend to have a number of projects on the go at once with fingers in many pies.

Unfortunately, both my home and studio tend to be a very a good example of this little slant! Much to dismay of my obsessively tidy and organised husband. Luckily, (for me) he also has much patience, loves me dearly and tends to tidy up after me.

So to keep the peace, I do attempt to keep my 'stuff' to the studio and only small areas of the house where I may be doing a spot of crochet, sorting fleece or other little bits and pieces that can be done of an evening.

Anyhoo, what with it getting busy with both my stores for Xmas. Sesenarts and SesenArts and Crafts, Ive got scarves on the go, ribbons dyeing, photographs to take etc, etc. And they are all happening at the same time in the same space. And its getting scary in there!

Its time to get organised!
Ive always read its best to start with one small space. And that sounds like a good plan to me! So I think it will be the office desk. (and its really scary!) That's my job for this weekend. 

How do you keep your creative bits and pieces organised?